|
 Week
Two Lecture: Drawing Lines/Scale/Intro Dimensions Week
Two Lecture: Drawing Lines/Scale/Intro Dimensions
 Return
to Classroom Return
to Classroom
It is a necessity
that you read and follow all instructions throughout the Lecture.
Lectures are designed with interactivity, to aid in the learning
process. Often times the lectures will include tips for properly
completing assignments. Be sure to read all information, view all
audio and video files and complete all practicals associated with
each lecture.
Overview
Lettering and the Ames Lettering Guide
Equipment
and Scale
Lines
Squares
Drawing Plans
Recap
 Overview Overview
Lines in architectural
drawing are the essential element of communication. It is through
drawings that the Architect/Interior Designer explains their ideas
- design ideas. It is essential that the Architect/Interior Designer
master the basic drawing techniques that we will cover this session.
Simply put if you can't draw it doesn't matter how good your ideas
are because no one will ever see them.
During
this session you will view video clips on:
Tools
How to Use a Scale
The Ames Lettering Guide
Thin, Medium and Thick Lines
Drawing Lines.
 Lettering
& The Ames Lettering Guide Lettering
& The Ames Lettering Guide
The first thing
I would like to work on is lettering. We made great progress last
week but lettering is a skill that takes a lot of practice. Remember
to always use your straight edge to make your verticals. The straight
side of the Ames lettering guide works great for this. Also, don't
forget that dark black letters are our goal.
Before we get
started practicing lettering, I want you to first view the video
on the Ames Lettering Guide. The Ames Lettering Guide works like
the chalk holder your elementary school teacher used. It makes guidelines
for you to use when doing your architectural lettering. I want you
to know that it will take a bit of practice to master this tool
- so be patient as you get started.
Click here to
view the Ames Lettering Guide Video 56K
- 256k
Click
here to view Lettering
Example Files: A-Z and 0-9
<flash player>
Now that you
have viewed the Ames Lettering Guide Video, use your lettering guide
and your 3H lead to draw a number of guidelines with your lettering
guide set at 6. These guide lines are now 3/32" apart and if
you use one space your letters are 3/32" high and if you use
two spaces your letters are 3/16" high. Practice making guidelines
and writing the alphabet at 3/32" and 3/16" high.
Have
Questions?
If
you have questions regarding any of the material covered in this
section, visit the "Week Two: Lettering and Ames Lettering
Guide " Discussion Forum. The forum can be accessed by
clicking on the "Activate Course WebCT Account" link
located on the course "Classroom" page. Once inside
WebCT's discussion board, post questions and/or comments under
the appropriate forum.
 Equipment
& Scale Equipment
& Scale
Next, I want
you to look at the videos on Tools and Scale. After viewing those
video clips we'll be ready to work on scale some more. View the
video now and then return to this lecture.
Click here to
view the Tools Video 56k -
256k
Click here to
view the Scale Video 56k -
256k
Let's do a little
work on reading your architect's scale. Your scale should never
be used to draw lines it should only be used for measuring. Here
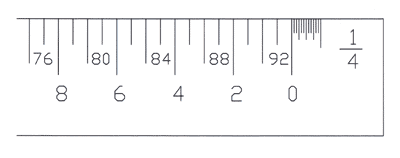
is an example of what your scale would look like at ¼ "
scale. If you drew a 4' line at ¼" scale the line would
actually be 1" long because each foot is represented as a ¼"
length.

Let's
go over a few things you should notice on your scale:
Find
the 0. To the left of the zero the inches are represented and
to the right of the zero are feet. When you look at the inches
you have to remember that there are 12" in a foot. When looking
at the scale you should see that in the ¼" scale the
inches are divided in inch and half inch increments. Now looking
to the right at the foot increments, you notice that there are
two strings of numbers- one high and one low. To figure out
which numbers to read, look at the 0 and read the numbers that
are in line with the 0.
The best way
to learn to read a scale is through practice! Assignment
2A focusses on lettering and scale skills. See "Assignments"
link under Week Two on the course "Classroom" page, for
detailed assignment instructions.
Have
Questions?
If
you have questions regarding any of the material covered in this
section, visit the "Week Two: Equipment and Scales"
Discussion Forum. The forum can be accessed by clicking on
the "Activate Course WebCT Account" link located on
the course "Classroom" page. Once inside WebCT's discussion
board, post questions and/or comments under the appropriate forum.
 Lines Lines
As we said earlier,
an Architect and Interior Designer communicates their ideas through
drawings. These drawings are made using Lines and Letters. We have
already begun to master letters so the next big step is drawing
lines. Don't worry if you "can't draw a straight line".
It is very difficult for anyone to draw a straight line without
using tools. So, for this course, always use tools to draw straight
lines. Triangles and the T-Square are the tools we'll use.
It is difficult
for me to talk you through drawing lines so I want you to view the
video clips on linework. Before you begin the video set your drawing
surface up with a sheet of vellum paper (taped down) and your T-square
and triangles ready to use. You will also need your lead holders
and the 3H and H Lead. As you view the video practice making thin,
medium and thick lines. View the video now and then return to this
lesson.
Click
here to view the Thin, Medium, and
Thick LinesS Video
Have
Questions?
If
you have questions regarding any of the material covered in this
section, visit the "Week Two: Lines" Discussion Forum.
The forum can be accessed by clicking on the "Activate Course
WebCT Account" link located on the course "Classroom"
page. Once inside WebCT's discussion board, post questions and/or
comments under the appropriate forum.
Now that you
have seen the video and have done a little practicing you are ready
to do Assignment 2B.
Assignment
2B Tips:
As
you begin the assignment you will want to layout the sheet before
you draw a single line. First, you want to lightly mark off where
your title goes. Assignment 2B requires that you draw 15 lines.
You want those lines to be evenly spaced and aligned on the left
hand side of the paper. You'll want to measure in ½"
from the left edge of the paper and draw a light vertical line
down the side of the paper. Now mark off a point 1" down
from the top of the sheet. Mark ½" increments down
from that 1'' point along the vertical line. This planning will
guarantee you a well laid out sheet. The finished drawing should
have the correct line weights. Be sure to put the title and border
on the drawing.
Assignment
2B focusses on line drawing skills. See "Assignments"
link under Week Two on the course "Classroom" page,
for detailed assignment instructions.
 Squares Squares
You are now
able to draw a straight line and it is time to move on to drawing
a square. In the video clip on lines, John Silva showed us what
to look for in a well drawn square. For Assignment
2C, you will draw 3 squares all of them 1'-0" in size
but each at a different scale.
Right now
I want to talk about the correct way to draw a square. The first
thing you need to do is to set up your sheet of paper. Remember
to draw all of your lines as light guidelines (this means using
a 3H lead.) When your drawing is all done you will darken the
lines in with the appropriate line weights.
Let's
draw a 1'-0" square at ¾" scale...
The
first thing to do is to draw the top line of the square. Place
your scale along the top or bottom of your t-square or parallel
rule. Make sure the ¾" scale is on top and put a mark
at the 0 point and at the 5' point. Remove the scale and draw
a light line between the two marks.

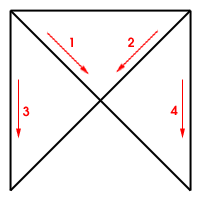
Next, draw
the vertical lines of the square. We could measure down 5'-0"
in scale but there is always a chance that we will measure incorrectly.
The most accurate way to draw and find the length of those sides
is to use our drafting tools. We can find the bottom edge of the
square by using our 45 degree triangle.

The last step
is to draw the bottom line of the square. Easy enough, just connect
the two bottom lines.

Ok, that's it!
You should now know how to draw the squares that you will use in
Assignment 2C.
Assignment
2C Tips:
Remember
that each square is 1'-0" each and each square is in a different
scale. Also, as you begin the assignment you will want to layout
the sheet before you draw a single line. This means that you need
to plan ahead. Nothing is worse then starting to draw your last
square and discovering that it won't fit. So be sure that you
measure and think about where things go on the sheet. The finished
drawing should have the correct line weights. Be sure to put the
title and border on the drawing.
Assignment
2C focusses on square drawing and scale skills. See "Assignments"
link under Week Two on the course "Classroom" page,
for detailed assignment instructions.
Have
Questions?
If
you have questions regarding any of the material covered in this
section, visit the "Week Two: Squares" Discussion
Forum. The forum can be accessed by clicking on the "Activate
Course WebCT Account" link located on the course "Classroom"
page. Once inside WebCT's discussion board, post questions and/or
comments under the appropriate forum.
 Drawing
Plans Drawing
Plans
Now that you
have gotten the hang of drawing lines and squares it is time for
a more Architectural drawing - a Floor Plan. This will be a simple
floor plan of a garden shed. Look at Assignment
2D [see week two assignment link in course Classroom for
detailed instructions on completing assignment 2D]. This drawing
shows the dimensions of the building. These dimensions will be used
by you to draw the shed but more importantly they will be used by
the contractor to build the shed. The dimensions on a drawing are
the information that governs the size of what is built. If the dimensions
differ from the actual drawn width of a door opening the written
dimension rules. We will talk more about dimensions in Lecture 3.
Right now, we simply need to be able to read the dimensions.
Assignment
2D Tips:
As
we begin this drawing once again you must think about how the
drawing is going to layout. Mark off your title area and mark
out where your plan will fall on the sheet. You will draw the
plan at ¾" = 1'-0" scale. The following steps
will show you how to layout a floor plan:
The first
step is to draw the outside lines of the shed walls. We will draw
these as a rectangle that is 5'-0" wide and 8'-0" long.
Remember light lines.
Click
here to view Plan1f
Next, draw
the inside lines of the shed walls. From the dimensions given
we know the walls are 8" thick. Be sure you find this information
on the assignment sheet. Use your scale placed against your straight
edge to mark off 8" towards the inside of the shed from all
4 walls. Draw the inside edge of the wall.
Click
here to view Plan2f
There are
now two rectangles on your sheet. We have not been concerned about
the door opening up to this point. It is easiest to draw the walls
lightly and then go back and mark the openings. The door opening
appears to be centered but we do not know that for sure. We always
go by the dimensions which tells us that the door opening for
the shed is 3"-0" wide and is 1'-0" in from the
outside wall. Measure over 1'-0" from the right side and
mark that point. Measure over 3'-0" from the 1'-0" point.
Draw your lines for the door opening.
Click
here to view Plan3f
The finished
drawing should have the correct line weights. Be sure to put the
title and border on the drawing.
Click
here to view Plan4f
Line weight
is something you read about in the Architectural Graphics book.
Line weights assist the viewer in "reading" your
drawing. In two dimensional drawings the "rules"
for line weight that we will use in this assignment are as follows:
In 2 dimensional
drawings (plans, sections and elevations) whatever is closest
to you is the thickest line.
In floor plans
we assumes that the plan is cut at 4'-0" above the ground.
Think of it as someone coming through this shed with a chainsaw
and cutting off the top of the building. As you look down from
above whatever you see closest to you is the thickest line whatever
is farthest away is the thinnest line. In the shed there is only
one lineweight because there is only one plane - the walls. The
walls are the closest to you so they are the thickest line, which
in this drawing could be a thick or medium line.
Assignment 2D
is now complete. Make sure to review assignment instructions via
the Week Two Assignment link on the course Classroom page to make
sure you properly completed all assignments for Week Two.
Have
Questions?
If
you have questions regarding any of the material covered in this
section, visit the "Week Two: Drawing Plans" Discussion
Forum. The forum can be accessed by clicking on the "Activate
Course WebCT Account" link located on the course "Classroom"
page. Once inside WebCT's discussion board, post questions and/or
comments under the appropriate forum.
 Recap Recap
Well it was another big week now your are drawing floor
plans in scale. Hopefully, you are amazed at how far you have come
in only 2 weeks time. Next week we will continue working on line
work and lettering. We will also draw another floor plan and begin
Orthographic Projection drawings.
|


