|
|
WebCT
 print
this page print
this page
What
is WebCT?
WebCT User Name/Password
How do I access WebCT?
WebCT Help
What
is WebCT?
WebCT is an Internet
based program that gives you access to your instructor and the other
students taking this course, along with various elements of the
course. WebCT is a password protected environment—you must
have a User Name and Password to access WebCT.
WebCT
appears to work best when viewed using Netscape Navigator version
4.77 or 4.76 (4.76 can be downloaded from Netcape
4.76 Downloads). We have had problems in the past when accessing
WebCT using Internet Explorer or AOL's built in browser. For this
reason, I highly suggest that ALL students use Netscape Navigator
4.77 or 4.76 to access this online course especially when taking
quizzes or exams. If you do not currently have one of these versions
on your computer, you can download it for
FREE or use one of the computers on campus to access the site.
- Students
will be able to communicate one on one with the instructor and
fellow students through WebCT Private E-mail. (link
labeled E-mail Instructor)
- Assignments
for this course will be submitted through the WebCT Assignment
Dropbox.
- Assignment
Due dates are handled via the WebCT Schedule (calendar).

- All students
enrolled in this course as well as the instructor can view Messages
posted on the WebCT Discussion Board. (if used in the
course)
- Students
can keep track of their course grades by accessing WebCT My
Grades.
- All Quizzes
and Tests will be accessed using WebCT Quizzes/Tests.
WebCT
User Name and Password
To
follow is the information regarding your User Name and Password.
If you have any problems logging in after reading all of the information
on this page, please contact the Training,
Technology & Learning center.
User
Name: firstnamelastname All lowercase,
no spaces
For
example, timothymoore
NOTE: even though a student with the name Timothy
may go by Tim the school database would most likely have him
listed as Timothy, so to properly access WebCT he must use his
full first name to access WebCT.
Password: socialsecurity# 8 numbers,
no hyphens
For example, 123456789
How
do I access WebCT?
Accessing
links in this course
Accessing all online courses
Accessing
Links in this Course
To access certain portions of your class, such as: Schedule, Tests/Quizzes,
Instructor Email, Grades, and Assignment Dropbox:
This
course has been designed with direct links to the WebCT items related
to the course. By clicking on Schedule, Grades, or various links
in the Classroom you will activate the WebCT account associated
with this course.
By
clicking on various links throughout this course you will prompt
the WebCT User Name and Password dialogue box:
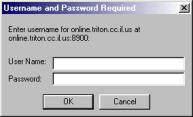
Enter
the appropriate information (User Name/Password
information is described above) and click OK.
You
will then directly enter into the WebCT portion of this course.
Accessing
All Online Courses
If you wish to access all of your online courses at Triton:
First,
you will first need to point your browser Netscape Navigator or
Internet Explorer to:
http://online.triton.cc.il.us:8900
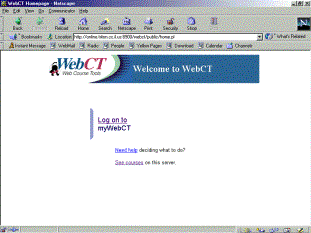
(The page that appears will look like the graphic below.)
Once
at this site, you should click on Log on to link. This will open a login dialogue box that will
ask for your User Name and password. Enter in your User Name and
Password as described above.
After
entering your User Name and Password, click on the OK button in
the dialogue box. This
will give you access to your myWebCT account.
In
myWebCT you will be able to access all the online classes for
which you have registered. The
classes will be listed in a column on the left hand sNamee of the
page (Your classes will be different than the ones listed here,
unless you are registered for the same classes.).
Clicking on the title of the course will take you to your
class.
WebCT
Help
Using
WebCT Private Mail (Email Instructor)
Using
the Assignment Drop Box
Taking
a Quiz or Exam in WebCT
Using
the WebCT Discussion Board
Using
WebCT Private Mail
 Mail
allows you and your instructor and fellow students in this course
to send private mail messages to each other without having to go
through an outsNamee email program. As long as you have internet
access and access to this WebCT course site, you will be able to
send and receive email messages. This is the preferred method
of communication with your instructor. Mail
allows you and your instructor and fellow students in this course
to send private mail messages to each other without having to go
through an outsNamee email program. As long as you have internet
access and access to this WebCT course site, you will be able to
send and receive email messages. This is the preferred method
of communication with your instructor.
There are four
default folders for each user. All: contains all messages;
Draft: contains all unsent messages; Inbox: contains
all received messages; Outbox: contains all sent messages.
- Click on
the Mail tool to get into the feature
- Your current
mail folders will appear showing you how many messages you
have and which ones are unread
To
Send a Message
- Click Compose
Message. The Compose Message window appears.
- Complete
the Send to text box by typing the name of the recipient(s) or
viewing the list of possible recipients.
a) To
view the list of possible recipients: click the Browse button.
b)
To select a recipient, click their name.
c) To
select more than one recipient, hold the SHIFT key while selecting
the names.
d)
Click Done.
- Complete
the subject line, and type your message in the text box. Blank
subjects or messages are NOT allowed.
- If you would
like to attach a file
a) Enter
the filename of the attachment.
b) Click
Attach File. The filename appears.
- Click Send.
The mail is sent and a copy is placed in the Outbox folder.
Reading
Mail
- From the
Mail Folders table, click the folder that contains the mail that
you would like to read. The Mail Messages screen appears.
- To display
any mail that was just sent, click Update Listing.
- Click the
hyperlink to the message that you would like to read. Note: only
unread messages are listed; to view all messages, click Show All.
- If the mail
includes a file attachment you'll see a paper clip icon. Note:
for security reasons, it is recommended that you download the
attachment to your own computer before you view it, but you can
just open it directly through WebCT.
- To download
the file attachment, click the paper clip icon, and then follow
the instructions for downloading from your browser. When the download
is complete, click Done.
- When you
have finished reading the mail, you can either close the message
(Click Close. The Mail Messages screen appears) or forward the
mail, reply to it, or download the message.
Marking
all mail as read
- From the
Mail Folders table, click the folder that contains the mail that
you would like to mark. The Mail Messages screen appears.
- Display the
messages that you would like to mark. By default, only unread
messages are listed; to view all messages, click Show All.
- Click Mark
all as read. The message: There are no unread messages in this
folder appears.
Marking
selected mail as read
- From the
Mail Folders table, click the folder that contains the mail that
you would like to mark. The Mail Messages screen appears.
- Display
the messages that you would like to mark. By default, only unread
messages are listed; to view all messages, click Show All.
- Select the
messages that you would like to mark as read.
- From the
Apply to selected message(s) below drop-down list, select Mark
as read. Click Go.
Using
the Assignment Drop Box
 The
Assignment Drop Box enables students to attach their assignments
directly into WebCT in an organized manner. Instructors can then
open the assignments, grade them and post scores and comments directly
into WebCT. By using this tool a corresponding column for grades
is added in the Student Management Feature of WebCT where students
can access their personal point totals. The
Assignment Drop Box enables students to attach their assignments
directly into WebCT in an organized manner. Instructors can then
open the assignments, grade them and post scores and comments directly
into WebCT. By using this tool a corresponding column for grades
is added in the Student Management Feature of WebCT where students
can access their personal point totals.
Note:
Before using the assignment drop box, students must type
their assignments in a Word Processing Program (Microsoft
Word is the program to use for this course). The file must
then be saved on the students computer before accessing the
assignment drop box. Be sure to save your
file with the appropriate file name WebCT will NOT recognize
filenames with spaces, or characters that are not numbers or
letters.
- After you
have typed up your assignment and saved it to your computer: Click
the Assignment Drop Box from the WebCT Home Page (you can access
the WebCT home page via links on the Classroom page). The Assignments
screen appears.
- Click the
hyperlinked name of the assignment you want to submit. The Assignment
Instruction screen appears.
- To choose
the file to upload, click Student Files. The View/Upload Files
For Assignments screen appears.
- Click Upload.
The Upload File For Assignment screen appears.
- To locate
the file, click Browse to open your local computer's browser (note
you may have to change the files of type box at the bottom of
the browse window to view "all files").
- Select the
file by clicking on it. The Upload File For Assignments screen
reappears, with the name of the file shows in the Filename text
box.
- To upload
the file, click Upload. The View/Upload Files For Assignments
screen reappears.
- Click the
Return to Assignment hyperlink. The Assignment Instruction screen
reappears.
- To submit
the assignment, click Submit Assignment. The Submit Assignment
screen appears.
- Click Submit
Assignment. A confirmation box appears asking you to confirm the
procedure.
- Click OK.
The Assignments screen reappears, with the message Not Graded
appearing in the Status column. When the assignment has been graded
by your instructor, this message changes to a hyperlink that says
Graded and your grade appears in the Grade column. Click the hyperlink
to view your instructor's comments about your work.
Note:
When naming an assignment file which you intend to upload, a
single-word filename MUST be used. WebCT will NOT recognize
filenames with spaces, or characters that are not numbers or
letters. Also be aware that in order for the instructor
to open a students file, the instructor must have the same
software on his or her computer that the student has used. For
this reason, all students MUST use Microsoft "Word" as
their word processing program.
Taking
a Quiz or Exam in WebCT
 There
is a time limit for each quiz and/or test, so make sure you are
aware of how much time you have before you start the quiz or test.
Once a quiz is accessed the clock starts and continues counting
down until the student actually submits the quiz for grading. Once
the time runs out, the student will no longer be able to save new
answers and must submit the quiz for grading. There
is a time limit for each quiz and/or test, so make sure you are
aware of how much time you have before you start the quiz or test.
Once a quiz is accessed the clock starts and continues counting
down until the student actually submits the quiz for grading. Once
the time runs out, the student will no longer be able to save new
answers and must submit the quiz for grading.
If a student
accNameentally gets knocked off-line the student should immediately
attempt to get back into the quiz and continue where he or she left
off. Please note that the time available that appears on
the clock only updates when the student clicks the save button and/or
submits the quiz. The time is still counting down on the
server even though it may not have changed on the screen.
To pick a correct
answer click in the check box before the answer you think is correct.
At the end of each question click the SAVE button. When you have
answered all questions be sure to click the FINISH button.
When asked if you want to submit the quiz for grading say YES.
Quiz
Grading and Viewing Your Score
After you click
the submit button, your quiz or test will be immediately graded
by WebCT and you can check your answers and score by clicking
on the "view results button" in WebCT. Below is an example of
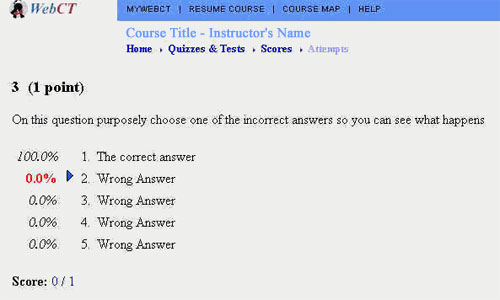
how questions are scored.
| The
Blue arrow indicates the answer chosen by the student.
The percentage number to the left of the answers indicates which
answer is correct and which ones are incorrect. In this
case the student chose answer #2 which was incorrect.
The 100% next to answer #1 shows that this was the correct answer
for this question. |
 |
Using
the WebCT Discussion Board
 WebCT
Discussion Board allows you and your fellow classmates to post,
read, and search for messages. The Discussion Board is divNameed
into different topics or conferences set up by the instructor. WebCT
Discussion Board allows you and your fellow classmates to post,
read, and search for messages. The Discussion Board is divNameed
into different topics or conferences set up by the instructor.
By default,
the Bulletin board contains three public topics (see below) and
then the instructor creates however many other topics are needed
for the course: All:
contains all messages from all public topics/conferences; Main:
the main discussion area; Notes:
messages related to a page of content in a Content Module.
To
Use the Discussion Board Feature
- Click on
the Discussion Board Icon from the WebCT Homepage to get into
the feature.
- Your current
bulletins categories will appear showing you how many postings
you have in each category and which ones are unread. You can also
see which conferences are private or public.
To
Post a Message
- Once insNamee
the Discussion Board, click the topic that you want to post a
message to. (The Discussion Messages window appears).
- Click Compose
Message" towards the top of the screen. The Compose Message window
appears.
- Make sure
your topic is showing the correct forum you wish to post your
message in. * If not, click the down arrow and choose the correct
one.
- Complete
the subject line, and type your posting in the text box. Blank
subjects or messages are NOT allowed.
- Click Post.
Your message is posted on the Bulletin Board.
To
attach a file to the Discussion Board:
- Click the
Browse button and locate the file that you would like to attach.
(please note: you may have to change the files of type at the
bottom of the browse box to show "all files").
- After selecting
the file to be attached and it's name shows up next to the Browse
box click Attach File.
- The filename
appears underneath the Attach file box with a check box next to
it.
- Select the
check box next to the filename or click the delete attachments
button.
Reading
a posting on the Discussion Board
- After clicking
on the discussion board icon from the WebCT homepage, click the
topic that contains the messages that you want to read. The Messages
screen appears.
- To display
any messages that were just sent, click Update Listing.
- Click the
hyperlink to the message that you want to read.
Note:
only unread messages are listed; to view all messages, click
Show All. Messages
are presented by threads; to view in chronological order, click
Unthreaded.
- If the message
includes a file attachment you'll see a paper clip icon. Note:
it is recommended that you download the attachment to your own
computer before you view it.
- To download
the file attachment, click the paper clip icon, and then follow
the instructions for downloading from your browser. When the download
is complete, click Done.
- When you
have finished reading the message, you can either close the message.
(click "Close". The Messages screen appears) reply or download
the message.
Replying
to a message
- From the
Discussion table, click the topic that contains the message that
you want to reply to. The Messages screen appears.
- Click the
message that you want to reply to. The message appears.
- Click Reply.
The Compose Message window appears.
- Type your
message in the text box.
- Click Send.
Marking
all postings as read
- From the
Discussions table, click the topic that contains the messages
that you want to mark. The Messages screen appears.
- Display the
messages that you want to mark. By default, only unread messages
are listed; to view all messages, click Show All.
- Click Mark
all as read.
WebCT
Help section compiled by Marcy Satterwhite; edited by Amy Hornbrook.
|